Week 7 [Mon, Mar 2nd] - Topics

Detailed Table of Contents


Guidance for the item(s) below:

While the next few topics are optional, we recommend that you have a quick look anyway, just so that you know their existence at least.

[W7.1] Java: Varargs : OPTIONAL

W7.1a : OPTIONAL

C++ to Java → Miscellaneous Topics → Varargs


[W7.2] Java: streams : OPTIONAL

W7.2a : OPTIONAL

C++ to Java → Miscellaneous Topics → Streams: Basic


Guidance for the item(s) below:

JavaFX is not required for this course as we strongly discourage you from creating a GUI app. If you are still interest to learn JavaFX, given below is a link to some tutorials.

[W7.3] Java: JavaFX : OPTIONAL

W7.3a : OPTIONAL

C++ to Java → Miscellaneous Topics → JavaFX


[W7.4] Documentation Tools


Javadoc

Guidance for the item(s) below:

You'll need to add JavaDoc comments to the iP code this week. Let's learn how to do that.

W7.4a

Implementation → Documentation → Tools → JavaDoc → What

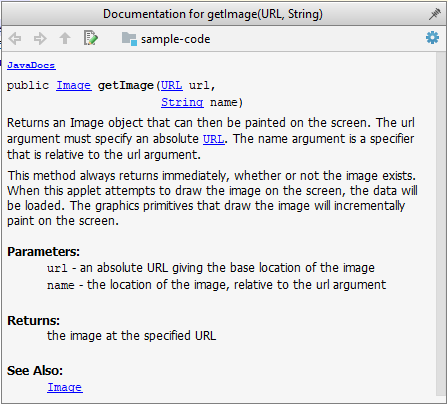
JavaDoc is a tool for generating API documentation in HTML format from comments in the source code. In addition, modern IDEs use JavaDoc comments to generate explanatory tooltips.

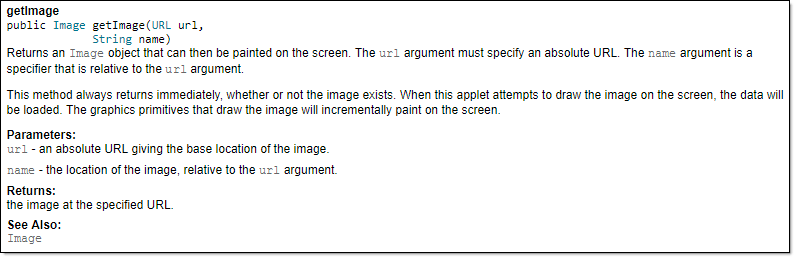
An example method header comment in JavaDoc format:

/**
 * Returns an Image object that can then be painted on the screen.
 * The url argument must specify an absolute {@link URL}. The name
 * argument is a specifier that is relative to the url argument.
 * <p>
 * This method always returns immediately, whether or not the
 * image exists. When this applet attempts to draw the image on
 * the screen, the data will be loaded. The graphics primitives
 * that draw the image will incrementally paint on the screen.
 *
 * @param url An absolute URL giving the base location of the image.
 * @param name The location of the image, relative to the url argument.
 * @return The Image at the specified URL.
 * @see Image
 */
public Image getImage(URL url, String name) {
    try {
        return getImage(new URL(url, name));
    } catch (MalformedURLException e) {
        return null;
    }
}

Generated HTML documentation:

Tooltip generated by IntelliJ IDE:


W7.4b

Implementation → Documentation → Tools → JavaDoc → How

In the absence of more extensive guidelines (e.g., given in a coding standard adopted by your project), you can follow the two examples below in your code.

A minimal JavaDoc comment example for methods:

/**
 * Returns lateral location of the specified position.
 * If the position is unset, NaN is returned.
 *
 * @param x X coordinate of position.
 * @param y Y coordinate of position.
 * @param zone Zone of position.
 * @return Lateral location.
 * @throws IllegalArgumentException If zone is <= 0.
 */
public double computeLocation(double x, double y, int zone)
    throws IllegalArgumentException {
    // ...
}

A minimal JavaDoc comment example for classes:

package ...

import ...

/**
 * Represents a location in a 2D space. A <code>Point</code> object corresponds to
 * a coordinate represented by two integers e.g., <code>3,6</code>
 */
public class Point {
    // ...
}

Resources:


Guidance for the item(s) below:

This is the final installment of the code quality topics. As you are learning about JavaDoc comments this week, you can also learn these guidelines to write better code comments.

[W7.5] Code Quality: Code Comments

W7.5a

Implementation → Code Quality → Comments → Introduction

Good code is its own best documentation. As you’re about to add a comment, ask yourself, ‘How can I improve the code so that this comment isn’t needed?’ Improve the code and then document it to make it even clearer. -- Steve McConnell, Author of Clean Code

Some think commenting heavily increases the 'code quality'. That is not so. Avoid writing comments to explain bad code. Improve the code to make it self-explanatory.


W7.5b

Implementation → Code Quality → Comments → Basic → Do not repeat the obvious

Do not repeat in comments information that is already obvious from the code. If the code is self-explanatory, a comment may not be needed.

Bad

//increment x
x++;

//trim the input
trimInput();

Bad

# increment x
x = x + 1

# trim the input
trim_input()

W7.5c

Implementation → Code Quality → Comments → Basic → Write to the reader

Write comments targeting other programmers reading the code. Do not write comments as if they are private notes to yourself. Instead, One type of comment that is almost always useful is the header comment that you write for a class or an operation to explain its purpose.

Bad Reason: this comment will only make sense to the person who wrote it

// a quick trim function used to fix bug I detected overnight
void trimInput() {
    ....
}

Good

/** Trims the input of leading and trailing spaces */
void trimInput() {
    ....
}

Bad Reason: this comment will only make sense to the person who wrote it

def trim_input():
"""a quick trim function used to fix bug I detected overnight"""
    ...

Good

def trim_input():
"""Trim the input of leading and trailing spaces"""
    ...

W7.5d

Implementation → Code Quality → Comments → Intermediate → Explain WHAT and WHY, not HOW

Comments should explain the WHAT and WHY aspects of the code, rather than the HOW aspect.

WHAT: The specification of what the code is supposed to do. The reader can compare such comments to the implementation to verify if the implementation is correct.

Example: This method is possibly buggy because the implementation does not seem to match the comment. In this case, the comment could help the reader to detect the bug.

/** Removes all spaces from the {@code input} */
void compact(String input) {
    input.trim();
}

WHY: The rationale for the current implementation.

Example: Without this comment, the reader will not know the reason for calling this method.

// Remove spaces to comply with IE23.5 formatting rules
compact(input);

HOW: The explanation for how the code works. This should already be apparent from the code, if the code is self-explanatory. Adding comments to explain the same thing is redundant.

Example:

Bad Reason: Comment explains how the code works.

// return true if both left end and right end are correct
//    or the size has not incremented
return (left && right) || (input.size() == size);

Good Reason: The code is now self-explanatory -- the comment is no longer needed.

boolean isSameSize = (input.size() == size);
return (isLeftEndCorrect && isRightEndCorrect) || isSameSize;


Guidance for the item(s) below:

Modern software projects, and your tP, make heavy use of build/CI/CD tools The topics below give you an overview of those tools, to prepare you to start using them yourself.

[W7.6] Continuous Integration/Deployment

W7.6a

Implementation → Integration → Introduction → What

Combining parts of a software product to form a whole is called integration. It is also one of the most troublesome tasks and it rarely goes smoothly.


W7.6b

Implementation → Integration → Build Automation → What

Build automation tools automate the steps of the build process, usually by means of build scripts.

In a non-trivial project, building a product from its source code can be a complex multistep process. For example, it can include steps such as: pull code from the revision control system, compile, link, run automated tests, automatically update release documents (e.g., build number), package into a distributable, push to repo, deploy to a server, delete temporary files created during building/testing, email developers of the new build, and so on. Furthermore, this build process can be done ‘on demand’, it can be scheduled (e.g., every day at midnight) or it can be triggered by various events (e.g., triggered by a code push to the revision control system).

Some of these build steps such as compiling, linking and packaging, are already automated in most modern IDEs. For example, several steps happen automatically when the ‘build’ button of the IDE is clicked. Some IDEs even allow customization of this build process to some extent.

However, most big projects use specialized build tools to automate complex build processes.

Some popular build tools relevant to Java developers: Gradle, Maven, Apache Ant, GNU Make

Some other build tools: Grunt (JavaScript), Rake (Ruby)

Some build tools also serve as dependency management tools. Modern software projects often depend on third party libraries that evolve constantly. That means developers need to download the correct version of the required libraries and update them regularly. Therefore, dependency management is an important part of build automation. Dependency management tools can automate that aspect of a project.

Maven and Gradle, in addition to managing the build process, can play the role of dependency management tools too.


W7.6c

Implementation → Integration → Build Automation → Continuous integration and continuous deployment

An extreme application of build automation is called continuous integration (CI) in which integration, building, and testing happens automatically after each code change.

A natural extension of CI is Continuous Deployment (CD) where the changes are not only integrated continuously, but also deployed to end-users at the same time.

Some examples of CI/CD tools: Travis, Jenkins, Appveyor, CircleCI, GitHub Actions


Guidance for the item(s) below:

Let's learn how to merge a PR on GitHub; you need to do that in the tP later, and you'll be practicing PR merging in the iP this week.

[W7.7] RCS: Merging PRs

W7.7a

Tools → Git and GitHub → Merging PRs


Guidance for the item(s) below:

Next, you will learn a workflow called the 'Forking Flow', which combines the various Git and GitHub techniques you have been learning over the past few weeks. It is also the workflow you will use in the tP.

[W7.8] RCS: Workflows

Guidance for the item(s) below:

The activity in the section below can be skipped as you will be doing a similar activity in a coming tutorial.

W7.8a

Tools → Git and GitHub → Forking Workflow

Guidance for the item(s) below:

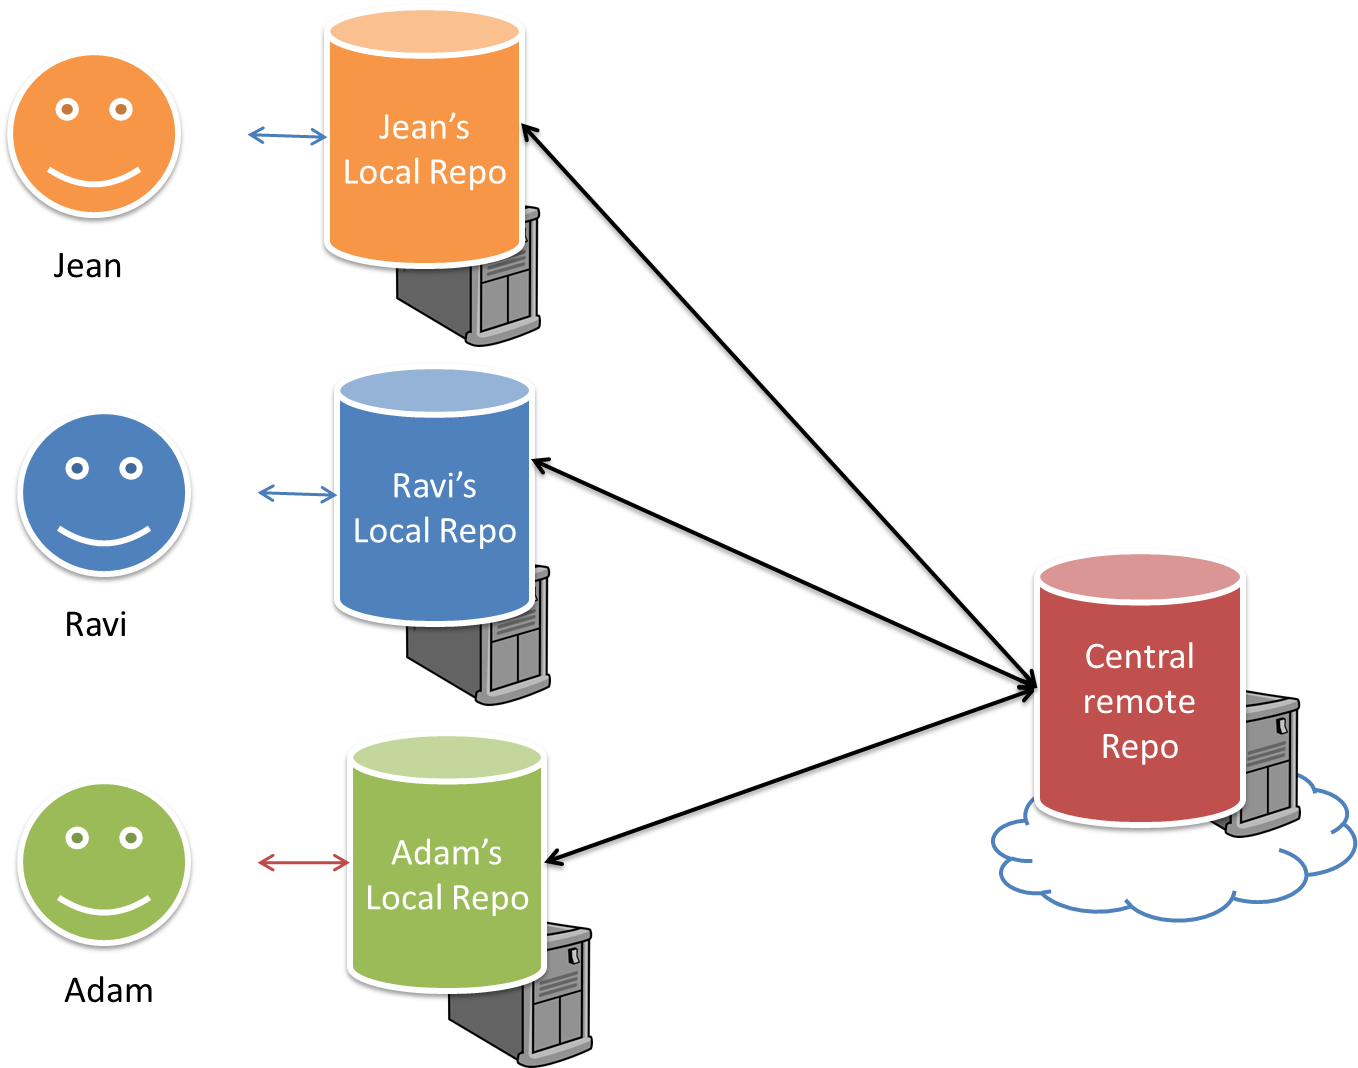
Git is considered a DRCS. Read the topic below to learn what that means and how it differs from the alternative.

W7.8b

Tools → Git and GitHub → Revision Control Models and Workflows

Guidance for the item(s) below:

These are two workflows that are riskier (but simpler) than the forking flow. After following the forking flow for a while, you may switch to one of these, but at your own risk.

W7.8c

Tools → Git and GitHub → Feature Branch Workflow

Feature branch workflow is similar to the forking workflow except there are no forks. Everyone is pushing/pulling from the same remote repo. The phrase feature branch is used because each new feature (or bug fix, or any other modification) is done in a separate branch and merged to the master branch when ready. Pull requests can still be created within the central repository, from the feature branch to the main branch.

As this workflow require all team members to have write access to the repository,

  • it is better to protect the main branch using some mechanism, to reduce the risk of accidental undesirable changes to it.
  • it is not suitable for situations where the code contributors are not 'trusted' enough to be given write permission.


W7.8d

Tools → Git and GitHub → Centralized Workflow

The centralized workflow is similar to the feature branch workflow except all changes are done in the master branch.